

Sash window sill replacement is a great way of saving money on costly replacement and can even be done by an advanced DIY enthusiast or carpenter with the right guide, showing all the good things to do, and bad to avoid. In this article I will break down piece by piece how you can repair your own sash window sill, and if you decide it’s a little too much work, you are always welcome to contact London Sash Window Repairs Ltd, and we will be glad to help you. Sash window sill replacement is, in broader terms, classified as a sash window repair. So you’ll need a normal sash window repair tool kit. I’ll go into this in detail shortly, as well as the material requirement, and if you are in London, exactly where to purchase materials, the same way professionals do, and at the same prices.
To make the article easier to follow, it’s broken into anchor points:
Your probably wondering why I would give away the very information I use to make a living? The first reason, by showing you sash window sill replacement, if you decide not to do so yourself, you’ll know you can rely on us to do it for you.
Secondly, it’s actually very straight forward. London Sash Window Repairs Ltd simply could not replace every sill and I firmly believe in being self sufficient, so if there’s a chance to help that, I will and you should always try to repair your sash windows before replacing, this is a great way to spread that message, plus the benefit to the environment of looking after your sash windows is clear. There are around 3.5 million homes in London. It’s reasonable to guess half have wooden or sash windows, it’s probably higher. The total number of windows in a home we could take a real guess and say ten, it’s probably much more, so let’s take a wild stab and say we’ve got 17.5 million windows to work with. Now each window needs servicing every fifteen years with the quality of sash window draught proofing and overhaul available today, that means every year there are 1.75 million windows in London that need a service. This doesn’t even begin to consider that maintenance not carried out, this will result in sash window refurbishment being required as well. So since just covering the service of windows alone in London, we would need to get through 35,000 windows a week, it’s pretty fair to say there’s more than enough windows! So let’s get back to our sash window sill replacement guide.
The tools you’ll need for sash window sill replacement are:
– Hammer.
– Hand saw.
– Pliers.
– Router and 8-10 mm straight flute cutter.
– Electric planer, hand is ok but you’ll then need a skill saw as well, or strong, tired arms follow.
– Side cutters.
– Large wrecking chisel.
– Optionally a small, wide lever bar.
– Good chisel, sharp, about 1 inch is ideal.
Material requirement for sash window sill replacement:
– Window sill 6’ by 3’, don’t let the builders yard give you 6’ by 2’, totally the wrong section, that’s for wooden casement window repairs, and replacement. Here’s a cross section of the sill you need, so you don’t get it wrong.
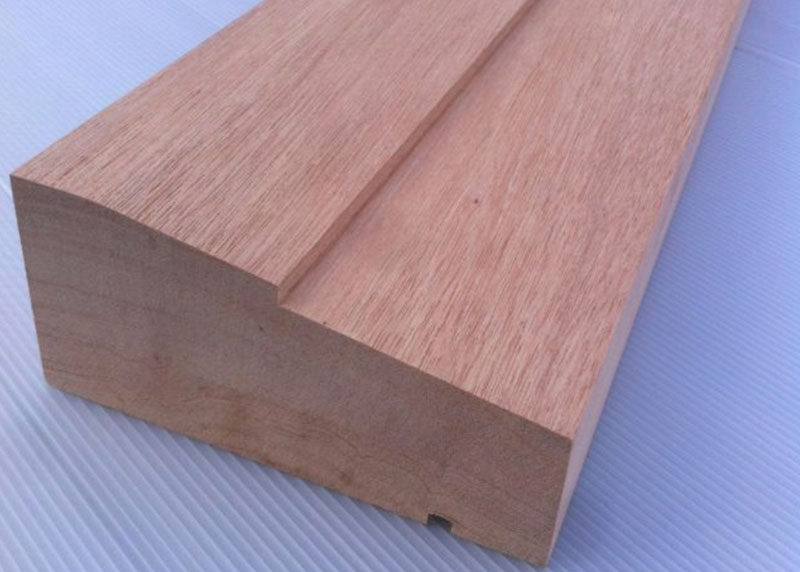
– 5’ by 1’ for the front cheek and pulley stile.
– Wood glue.
– 70 mm wood screws.
– 40mm wood screws
– Two part epoxy filler.
Sash window sill replacement part one -removing wooden sill section.
The first part of the job is to dust sheet properly to avoid any damage to your property. I cover very comprehensively the merits of dust sheeting properly in the article highlighted. You don’t want to make a problem fixing a problem, that’s no net gain.
Removing the sill section is quite straight forward, but you’ll need to be as careful as possible to not disturb or damage the surrounding plasterwork. Before doing anything, measure the staff bead from one end to the other and make a note of this measurement. As you remove the sill, you’ll move the frame, you want to put everything back together as if original.
1. Remove internal nosing.
Remove the internal nosing first, you’ll be re-using that so needs to come off in one clean, undamaged piece. If you’re unsure what that is, please take a look at the image below which has already had the nosing removed, it’s the trim that protrudes from the sill section itself and in the example you can see flakey paint where it was connected to the architrave. Start with your wrecking chisel at one end of the frame right next to the architrave, and gently work your way along. The nosing may be attached with planking nails (Rosehead), and will need a good amount of leverage. This is where a flat lever bar comes in really handy, controlled pressure considerably reduces the likelihood of damage to internal plaster.
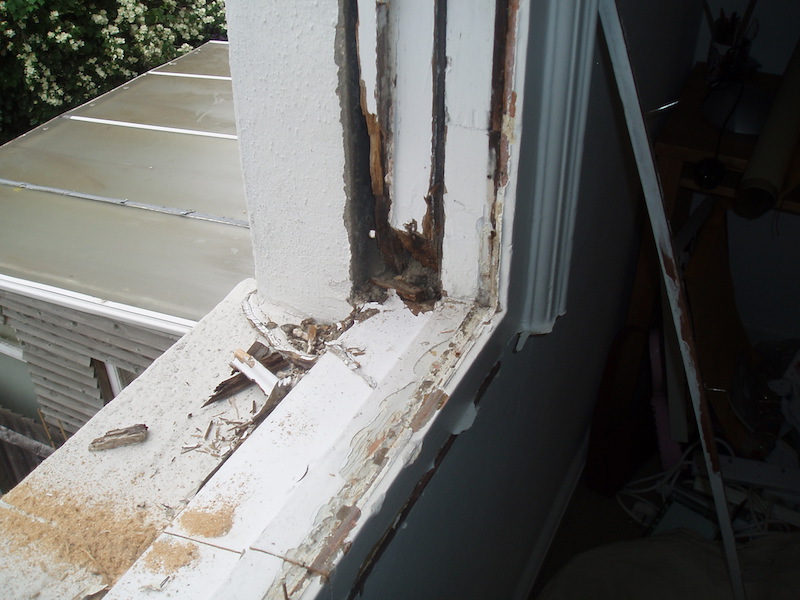
As you can see from the large chunky flakes of paint on the inner side of the sill, this is going to leave you nosing looking a little rough. We will use a belt sander to feather in the layers of paint prior to attachment. You don’t need to do this but it’ll make a nice finish when nosing does eventually get re-attached.
2. Cut sill through middle.
Cut through the sill somewhere close to the middle, you can just about make this out in the image above, we will fold the sill section up and outwards eventually, imploding the window sill on itself, to cause minimal damage. Cut through the pulley style at a 45 degree angle, this will be removed prior to removing the sill, as it’ll make the job easier. Make the cut somewhere between the pocket space as this is the only point of easy access for your saw.
3. Cut out and remove pulley stile(Jamb) and Front/Inner Cheek.
With your wrecking chisel remove the pulley stile you just cut. You’ll need to use your chisel to free it from the front and back cheek. In the example above, you’ll need to replace the front cheek as well as the pulley stile. You can see that it’s rotted away entirely on the front edge. In the image below you can see pulley stile removed as well as front cheek that’s been cut away ready for a splice. Note, this is quite a fiddly job and requires a good bit of effort, and there’s possibility you’ll blunt your handsaw if you are not careful with the brickwork. You should be keeping the removed pulley stile and front cheek as you’ll need to make those from your 5′ by 1′ you previously purchased and using the old ones as template when working on the bench is very handy, and saves measuring in the frame.
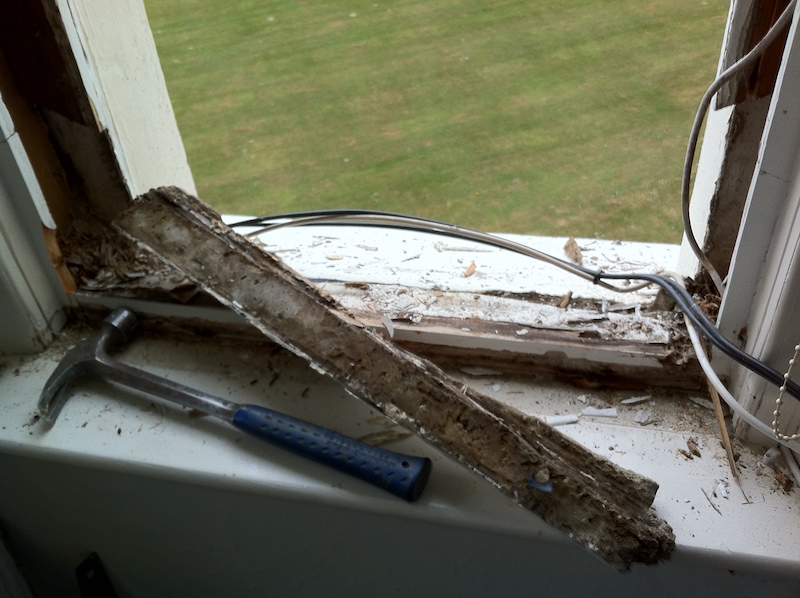
As you can see from the picture above. This job can make a mess, and the dust sheeting is very important as I always mention. If you have wires that are randomly placed on top of the sill, then this is the perfect time to send them through the box, or even wall as you now have reasonable access.
4. Remove sill section.
Now your sill can be removed. The sill should still have mechanical fixings in the front and inner cheek, you’ll need to free them with your wrecking chisel, sometimes I’ll attempt to cut through these nails just so the box doesn’t need to be opened up too much.
Sash window sill replacement part two – Notching out for sash window
5. Cut sill section to length and replicate the front cheek, and pulley stile.
For the sill to be housed in properly, you need to allow an additional 5 inches in length overall. You’ll cut out the sill section so that the pulley stile can be housed inside, as well as cutting out for the front and back of the sill. If you cut your sill directly to the length you measured above. You’ll end up doing a job called ‘cut and shut’. I notice it’s become popular because of resin being able to bond the frame to the sill, I however, prefer to do the job properly if the client will pay the extra(they get a proper job after all), and so I am going to show you how to house the sill properly. The easiest way to start housing your sill, is to make the first cuts, the length you measured for the staff bead. Let’s imagine your sill is 36’, your overall sill section would be 41’ long. You’ll allow 2.5’ either end and make a cut. Then you can make another cut 25mm, closer to the edge of the timber each end. This cut is to house the pulley stile, you should only cut leaving half way, or so, leaving a depth of more than an inch, or the ends holding it all together won’t be strong. This part is the most technical and easiest to get wrong. To explain this as clearly as possible please take a look at this sill section already notched out that I computer generated to make this process clear.
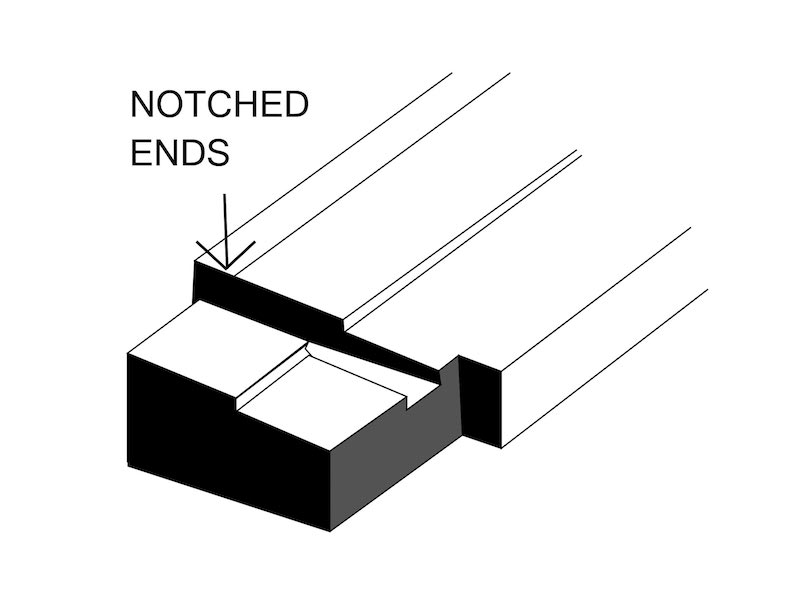
This illustration shows far more clearly than any real picture, what you are trying to achieve. Once the sill is cut you need to replicate the pulley stile and front cheeks that you previously removed. This is far easier than the sill you previously notched out, just take your time measuring and cutting. You’ll need your router with an 8mm or 10mm straight flute cutter to make the groove for the parting bead, and use a planner to take the width down. You bought 5′ by 1′, most normal pulley stile widths are slightly less than this, but wider than 4′ by 1′. For the front cheek you’ll need a skill saw, or table saw. You can cut it down by hand, the front cheeks are normally around 3′, so you could even use your electric planer as that’s going to be a lot quicker than a hand saw, you’ll make a fair bit of mulch for the garden too!
Part 3 – Rebuilding your box sash window frame
6. Offer in sill section and cut profiles to length.
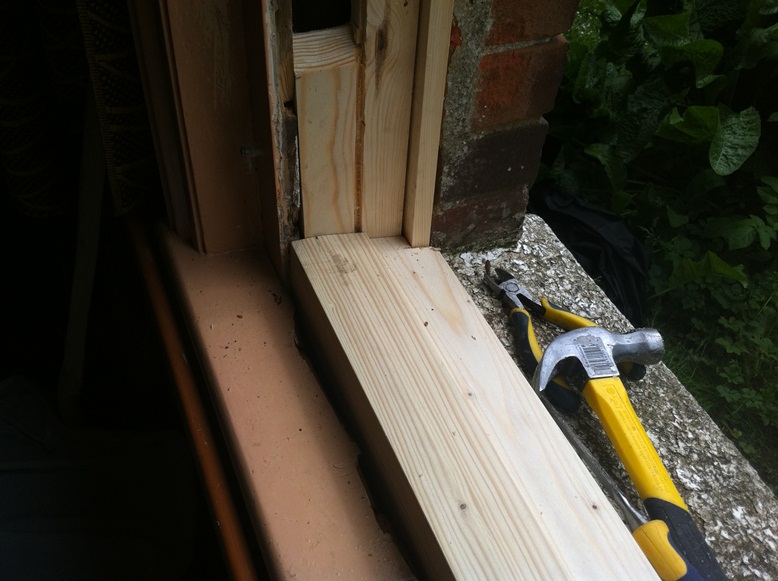
Once the timber profiles are made you will offer in the sill, and then measure the front cheek which you can now cut to length. Notice we put the window back together, in exactly the opposite order we took it apart. With the front cheeks firmly glued and screwed, you’ll now offer in your pulley stile. You’ll see you need to also cut the pulley stile so that the pocket can sit back in it’s original place nicely. Sash window sill replacement is a time consuming job if it’s new to you, so just steadily, make your marks, and make the cuts one by one. Rushing this stage, means doing again. Once you’ve offered in your pocket and all fits together nicely, begin countersinking and screwing all the timber together.This is where your size 3.5 40mm wood screws are used. If you’ve notched out well, you won’t need to fix the pocket, it shouldn’t be either, as it’s the weight access. Now fill the heads with the epoxy two part. If it’s all gone well you will have a window that looks like this now.
Ironically, after talking about how the pocket should sit, in this example the window was made with 45 degree pockets – I’ve removed the pocket so you can see there is no step. This really isn’t ideal because it allows the pocket to slip, but that said, your pocket should still be fine if you’ve made a nice job of it, and worse case is you pilot and screw from the inner cheek. It’s not the perfect job, but I don’t think you’ll lose any sleep over it.
7. Attach Nosing and make good with epoxy two part resin.
At this stage you will attach the nosing, by countersinking and screwing, and then filling. This is where you’ll make use of the 70mm screws noted in materials required. The above image has a window ledge and is slightly different in orientation to the image provided below which is completed.
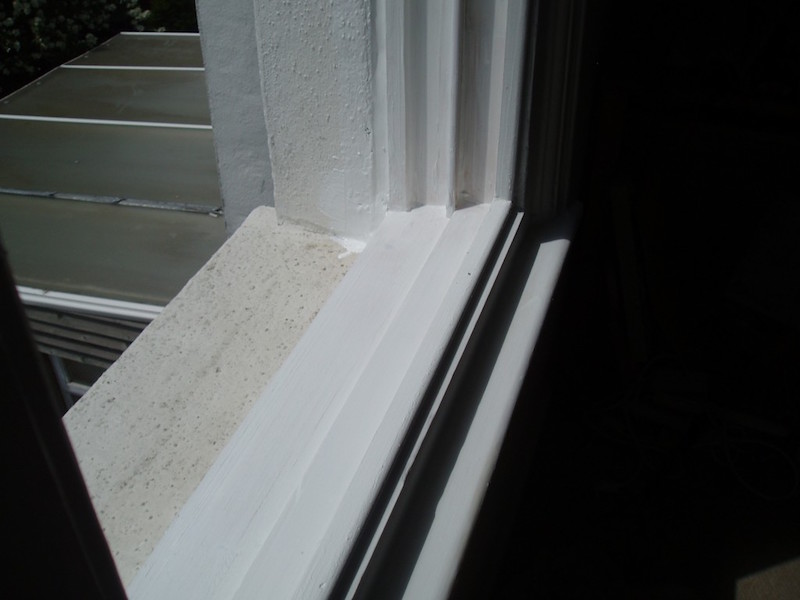
Now that the sill is back in and sealed it’s ready for decoration and pointing externally. If you look closely we even used the original staff bead. If you’ve cut and measured everything to length accurately this will cause no problem at all.
8. Making good, sealing, and priming – ready for decoration.
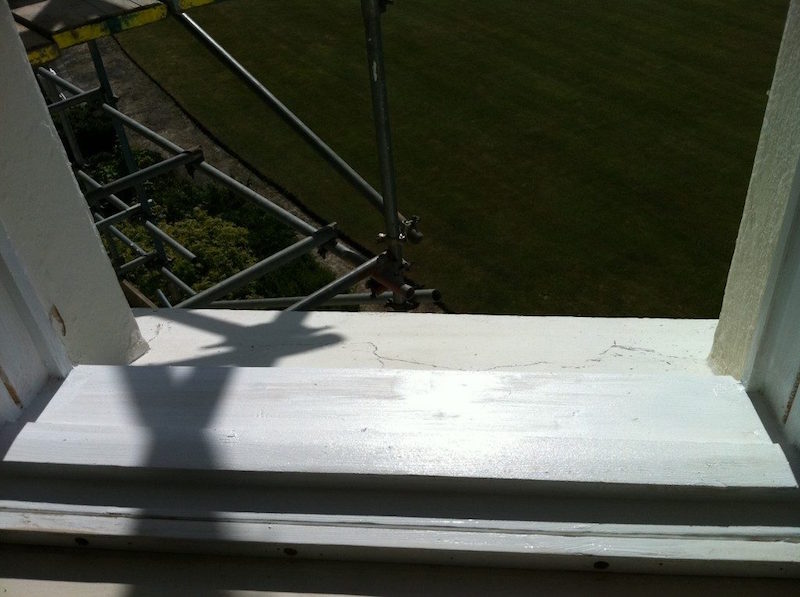
To finish up the window well you’ll need a decorators caulk, silicone, and some primer. Make sure to seal well externally as you’ll leave your home exposed to the elements. A silicone sealant is ideal. Once completed, your window should look a little bit like the example below.
You notice in this sash window sill replacement example above, the sill, pulley stile, and front cheek was replaced. This sash window sill replacement costs around £180 in softwood and is far more viable than entire replacement. There’s a lot of work to do in order to replace a sill correctly, however done properly your sash window sill, assuming you maintain and decorate correctly, will last you a lifetime. You’ll also protect the value of your home if you maintain your sash windows correctly.
Once you have done the job properly it’s time to decorate your sash window sills and the front of your property. I highly recommend you take a look at this beautiful example with roses climbing up the sash windows and walls. Interestingly it should be noted that this might cause damp areas. Please be sure to keep any foliage that falls clear of the windows. Decaying leaves are the perfect setting for more rotten sills unfortunately!

If you decide to go with inferior filling by contrast is a job you’ll do every three to five years. It’s simply because of the different movement points of both materials when in direct contact with sunlight for prolonged periods. If you’ve got this far you now might consider draught proofing your sash windows. Quality draught proofing, or even a DIY version will save you money on heating as well as make the home more comfortable. The final step in uprating your sash windows will be to double glaze them. This will reduce energy bills and lower carbon footprints. If you’d like to learn more about carbon footprints and double glazing please take a look at the link provided. You can really save energy with sash windows. We will be glad to show you how. In the next article I will be looking at how to decorate your sash windows properly. It’s becoming increasingly expensive, even more so than an overhaul and draught proof.